Lechon Kawali

There was one time where I was in a cooking frenzy trying to get ready for family and friends to visit. As a new friend with a kid was part of the group, I had the foresight to ask what her son liked and she said “anything crispy”. Lechon Kawali immediately came to mind. Honestly, I never cooked Lechon Kawali before this particular get-together. I have always been too scared of the deep-frying part as it could very well scar you for life as the hot oil could just make a spectacular splatter. Whenever I craved it, I always just go to my good friend Diona, who cooks it so well at Kanto. But then feeling the shame of loving the dish but not knowing to cook it, I then thought, “how hard could it be?” Whenever I ask that question, I tend to get more than I bargained for. Well maybe it is time for me to learn the dish I could never get tired of.

Lechon Kawali, crispy pork belly

So I took out all my cookbooks and researched on different recipes of Lechon Kawali. There were so many different versions and tips that I only selected the flavours I liked. I even went as far as watching YouTube videos on how to handle the deep frying part and neat tricks on how to make sure the crispiness of the skin. And I have them all compiled in here. Hope you enjoy it as much as I do!

——

Lechon Kawali
1 kg pork belly, preferably pre-cut into 3″x 3″ squares
1/2 cup Marca Pina Soy Sauce or Silver Swan Soy Sauce Soy Sauce
2 cups Sprite
3 cups water (add more to keep pork belly squares immersed)
1 tbsp whole black pepper corns
1 medium onion, chopped roughly in big cubes
3 cloves garlic
3 bay leaves
3 tbsp salt, for flavouring after rendering out the fat.
Cooking oil, enough to immerse the pork belly squares after rendering out the fat.

Pre-cooking the pork belly to tenderize the meat
1. Combine the pork belly squares, soy sauce, Sprite, water, black peppercorns, onions, garlic and bay leaves in a big cooking pot. Boil pork belly for 1 1/2 hr or until skin is tender with a nudge of the fork and appears translucent.
2. Dry pork belly squares on a rack and pat with a paper towel to remove excess moisture.
3. Rub boiled pork belly with iodized salt, evenly covering all surface to ensure a well-seasoned pork belly.
4. Store in freezer overnight to dry out the pork belly squares.

Deep-frying the meat
1. Pull out from the freezer an hour before frying and leave to thaw. The pork belly square might still be cold to touch but should not be frozen solid.
2. Heat oil on a deep pan with oil deep enough to immerse pork belly squares. When the oil is hot enough, place the meat in the deep pan. WORD OF CAUTION: This might get caustic and start splattering. Glove pot holders comes handy to protect your hand from oil splatters as you place the pork belly squares into the hot oil.
3. Partially cover the pan with a cover and weigh it down with a ceramic bowl to ensure that sudden splattering would not push the cover off the pan. Covering the pan can help cook the inside of the meat without drying it off.
4. Deep fry for about 10 – 15 minutes depending on the thickness of the pork belly.
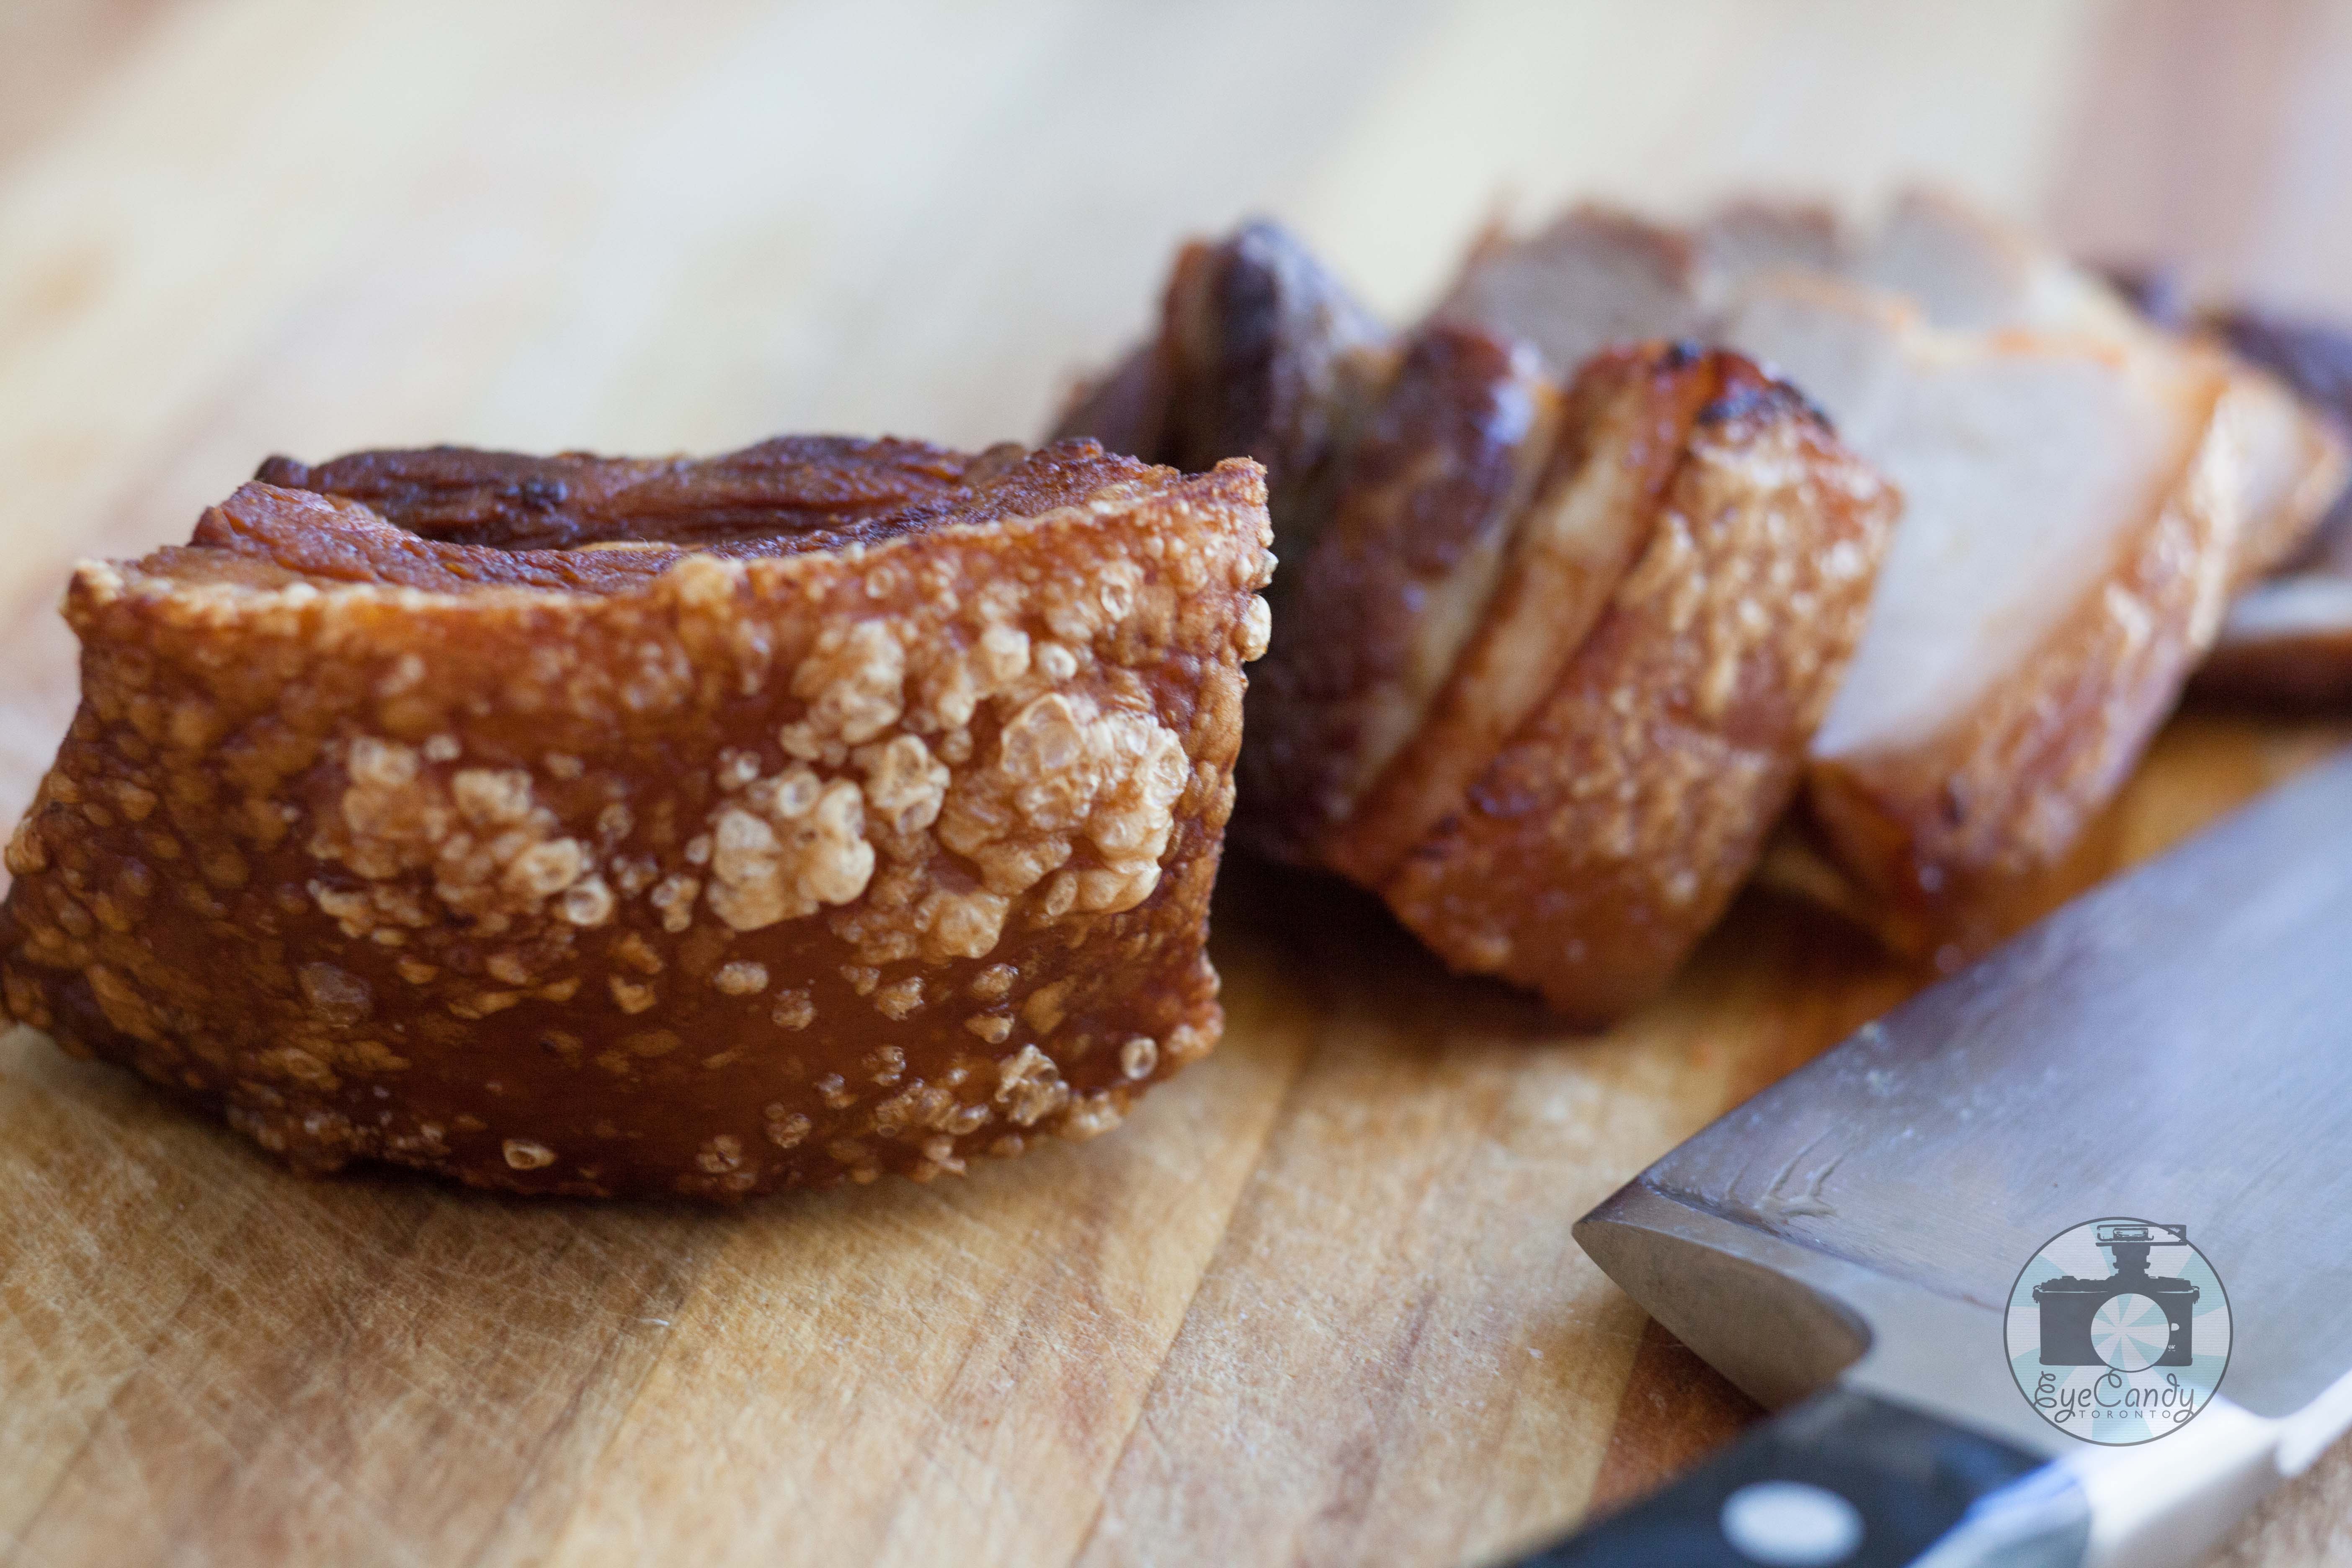
5. Once the skin starts to blister and crispiness sets in, remove the pork belly square from the pan, let it cool down on rack for about 15 minutes. Don’t slice prematurely. Letting it sit after frying helps with the crispiness of the skin.
6. Serve with Mang Tomas All-around Sarsa or UFC Banana Ketchup and pair with steamed rice.

Lechon Kawali, crispy pork belly

This is such a guilty pleasure and is so labor-intensive and I savoured every bite. Do you now understand why I never attempted to cook it before and just opt to get it from Kanto?

Tortang Talong

Now let’s talk about breakfast or what we Pinoys call agahan or almusal. There are a lot of dishes I could highlight and I will start with one dish. We tend to like the start to our mornings with something hearty and filling, more salty than sweet. One of my most favourite is what we call Tortang Talong or simply eggplant omelette. It’s pretty simple really, just three ingredients and paired with fresh steamed rice, I am all set to start my day.

Tortang Talong, eggplant omelette

The key to a good tortang talong is to be able to make the eggplant soft before adding the egg. The original way of softening the eggplant was to roast it over open fire. We normally place the whole eggplant on top of the heating element and let the flames scorch through the skin, turning it gradually to let the flames touch every part and cook it through. It takes a lot of patience and attention to get it done right. But it is very well worth the detail to make a good tortang talong.

My present living conditions present a different problem though as I have a ceramic topped range and I reinvented the recipe to match my condo living. I tried different ways, from placing it in the oven to boiling the eggplant in water to microwaving. I find the best way is microwaving. Just remember to score the eggplant with a fork in ample areas to release the moisture when using the oven or the microwave. That buildup of moisture trying to escape while roasting/cooking the eggplant can give you a magnificent boom if you forget to poke holes on the eggplant.

Do try this very simple dish. It is a comfort food I love and I hope you would start up your day on a positive note like mine.

——
Tortang Talong

2 Chinese long and thin eggplants
2 eggs, large
2 tbsp cooking oil for frying
soy sauce for dipping, preferably Marca Pina or Silver Swan

1. Score the eggplant with a fork, making holes to release steam while it cooks
2. Soften the Chinese eggplant (stem end intact) for about 2 minutes in a microwave for every eggplant. If using oven, preheat at 500 degrees F for about 20 minutes before roasting the scored Chinese eggplants for another 30 minutes. Set aside to cool.
3. When eggplants are cooled down to room temperature, peel the skin off gently, keeping the stem intact.
4. Break two eggs into a shallow bowl and beat eggs until frothy.
5. Heat a frying fan with the cooking oil for frying.
5. Place the softened and peeled eggplant on the bowl with the beaten egg and fan out the eggplant to thin it out and transfer eggplant to hot frying pan.
6. Fry until golden brown.
7. Serve warm with steamed jasmine rice. Use soy sauce for dipping.

Ginataang Gulay

Gata. Ginataan. This is any dish that has coconut cream or coconut milk dish. Gulay in turn is anything that is a vegetable. Coming from the Philippines, it must be rather obvious that we have a lot of dishes where coconuts are part of the recipe. One of the main coconut milk-infused dishes that I love is Ginataang Gulay. I have seen it with so many kinds of vegetable combinations but what I loved the most is the combination of squash (kalabasa) and string beans (sitaw).

_MG_9876

Just like any kid, I used to pout secretly when the dinner was something vegetable. It was a staple then to pair fried fish with vegetables as it is cheap and nutritious. But I didn’t mind much when it was a dish with squash. I actually find it comforting. It can just be squash simply sautéed (ginisa) with onions, garlic and seasoned with Filipino soy sauce and I am all set. I found out later that there was a better version, one that was the squash mixed in with long beans and swimming in creamy coconut milk. The velvety texture of the coconut milk marries perfectly with the sweetness of the squash and beans, this is definitely one of my comfort foods.

—–
Ginataang Gulay

Ingredients
500 g Squash, peeled and cubed
500 g String beans, cut into 2 inch strips
250 g pork, cubed (optional) + 1/4 cup water
1/4 cup Filipino soy sauce (suggested brand, Marca Pina or Silver Swan)
1 cup water
1 onion
3 cloves garlic
1 small can of coconut milk (5.5 fl oz or 165 mL)
salt and pepper to taste

Procedure:
1. Render the fat from the pork by placing the pork cubes in the pot with 1/4 cup water. Wait for water to evaporate and for the pork fat to render. Remove excess fat. Maintain enough fat for sautéing onions and garlic.
2. Saute onions and garlic. Add the soy sauce and simmer for a minute.
3. Add the water and let boil then add the squash and string beans and coconut milk. Stir well and let simmer, stirring occasionally until almost done. This should be about 5 – 10 minutes, depending on how crisp you want the squash and the beans to be. I rather like them soft and it takes me about 10 minutes.
4. Add salt and pepper to taste. Don’t be liberal with the salt as the soy sauce is already salty.
5. Serve warm paired with steamed rice and fried fish.

Chicken and Pork Adobo

Another iconic Filipino dish is the Chicken and Pork Adobo. When the word has its Spanish origins, it is very different from what it means in Spain than what it means to a Filipino. In Spain, the word comes from “Adobar” which means “soaking raw meat in a marinade to enhance the flavour”. Ask any Filipino and they would give you an entirely different explanation which would be mostly that it is a dish that is cooked in vinegar, soy sauce, garlic, bay leaf and peppercorns. While there are different spins to this dish from my country’s oh-so-many regions, what is common is that every Filipino embraces it as the unofficial national dish, finding comfort at its flavours and taste.

_MG_9222

Even if I am here in Toronto for a while now, it is still a dish that I have regularly. I normally cook it in a big batch and save the rest for later. The dish could hold itself for a long time and the flavour actually gets better and better over time. Even with my own recipe, I tend to like it two ways. There are days that I like it to be saucy, smothering fresh steamed rice with its salty gravy to whet my appetite. And then there are days that I reduce the sauce to completely dry it up, concentrating that salty, garlicky flavour to bits and eating it kamayan style.

I find that it is the most memorable dish that non-Filipinos remember trying in a Filipino household. I am often asked where they can find a Filipino restaurant so they can have the dish once again. So if you want to try it, here is my own personal recipe of Chicken and Pork Adobo.

Chicken and Pork Adobo Recipe
1 1/2 lbs (6 – 8 pcs) chicken thighs or chicken legs, bone-in and skin-on
1 1/2 lbs (approximately 650 grams) pork belly, chopped in cubes
1 medium onion, diced
1 head garlic, minced
2 cups water
3/4 cup vinegar, white or sugar cane
1/2 cup soy sauce (preferably Marca Pina or Silver Swan brand)
3 pieces dried bay leaves
2 teaspoons whole peppercorn
3 tablespoons cooking oil

In a deep sauce pan or wok, heat 3 tablespoons of oil and sear the meat enough to give a crust and texture to the chicken and pork cubes. Put the seared chicken and pork aside. Sauté the diced onions and minced garlic.
Add the seared pork and chicken back to the pan. Add 2 cups of water, 3/4 cup of vinegar, 1/2 cup of soy sauce, bay leaves and peppercorns. Bring to a boil. Cover and simmer over low heat for 45 minutes or until meat is tender. Serve Chicken and Pork adobo with freshly steamed rice.

Adobo flakes option:
Set aside cooked chicken and pork adobo pieces and mince to smaller pieces. Cook further in about 1/3 cup adobo sauce until sauce runs dry. This would really concentrate the flavours of the dish. As you reduce the sauce, it is also a good idea to add more minced garlic according to your preference. This would then be what we Pinoys call as adobo flakes. 🙂

Pinoy Tip:
Filipino Soy Sauce brands Marca Pina and Silver Swan is saltier than the more popular Japanese brand Kikkoman. Kikkoman has a degree of sweetness that can alter the taste of adobo.

Of course you can use just chicken or just pork, depending on what your favourite is. The combination of the other ingredients remain the same if you use the same amount of meat. I hope you can find comfort with this dish like we do. It is a piece of home that I would not part no matter where I go.

Lumpia

Lumpia has always been a go-to-bring-to-potluck thing for me. I find that it is something that is friendly enough for Filipino food first timers to try. Most people, despite not seeing what is inside the spring roll pastry, still pick one up very easily. I think it is the very nature that it is mostly 2 – 3 bites that even the most pensive person doesn’t give it too much thought and most first timers try it when they see it.

_MG_9284_Lumpia Collage

Back in Manila, we have several varieties of lumpia. There is the most popular Lumpiang Shanghai which comes deep-fried with meat filling, pork being the most common recipe that pairs well with a sweet and sour chili sauce or Filipino UFC or Jufran banana ketchup. There is Lumpiang Gulay which comes deep-fried too and is filled with a medley of carrots, beans, bean sprouts, onions and garlic that is in turn paired with vinegar tempered with onions, salt and garlic. There is a third kind which is called Lumpiang Sariwa where the wrap resembles an unsweetened crepe with an all-veggie filling of carrots, beans, jicama (singkamas) and lettuce and would be generously drenched in a peanut-garlic thick sauce. My most favourite of them all is Lumpiang Shanghai as every warm crunch leaves me with instant gratification that what I had on my hand was very good Filipino eats.

My personal recipe always changes as I tend to wrap whatever I have on hand in my fridge at the time that I crave it. I tend to fashion the lumpia filling to whoever I intend to enjoy it. I have good combinations of vegetables for different proteins, always minding that there would be an experience of different textures, flavours that work well together.

Lumpiang Shanghai Original Recipe
1/2 kg ground pork
1 medium carrot, minced
1 medium onion, minced
2 – 3 cloves garlic, minced
1 egg
1 tbsp flour
1 tsp salt
1/3 tsp pepper
Canola oil for deep frying
———-
Chicken Lumpiang Shanghai Recipe
1/2 kg ground chicken
1/2 cup minced red bell pepper
1 medium carrot, minced
1 medium onion, minced
2 – 3 cloves garlic, minced
1 egg
2 tbsp bread crumbs
1 tsp salt
1/3 tsp pepper
Canola oil for deep frying
———–
Shrimp Lumpiang Shanghai Recipe
250 g peeled fresh shrimps, chopped into small pieces
250 g rice vermicelli or bihon, softened in warm water and drained
1 medium carrot, minced
1 medium chayote (sayote), minced
1 medium onion, minced
2 – 3 cloves garlic, minced
1 tsp salt
1/3 tsp pepper
Canola oil for deep frying

Mix the chosen recipe in a medium size bowl. Before wrapping the filling, it is best to let the mixture sit in the fridge for 30 min (or freezer for 10 min if you are in a hurry) to be able to handle the wrapping better. All three recipes tend to be watery as you mix it and chilling the mixture would considerably dry up the mix and would be easier to wrap.

Lumpia wrappers can be found easily on the Asian food aisle in Toronto. They come in different sizes and it is dependent on you how much pieces you make by the thickness that you wish to have. I tend to prefer making small Lumpiang Shanghai, preferring the smallest size. The brand that I always see in groceries is TYG Spring Roll Pastry (click here to see the brand). Make sure to handle gently when separating the pastry and to cover the separated sheets with a clean dish towel. Long exposure to air tends to harden the pastry. I generally separate 10 pieces at a time and cover it with the towel, wrap the filling and then separate wrappers again.

To wrap the chilled filling, take a spring roll pastry and position it in diamond orientation. Place about a teaspoonful on one end and fold the lower edge away from you, making sure the fold snuggly secures the filling. Take the left and the right sides and fold. The spring roll should be able to turn and wrap itself with the wrapper about 3 times over. This would ensure that the spring roll would not unravel as it is being fried. Chill the spring rolls for about 30 min before frying to avoid moisture from spattering in the hot oil. Heat the cooking oil to 350F in a shallow pan enough to submerge the spring rolls. Fry the lumpia for 10 minutes and drain in paper towels after.

_MG_9339-Edit

It is always best to eat when it is freshly just been fried. Nothing beats the taste of freshly fried lumpia. Try to imagine me, eating 2 or 3 spring rolls for each batch that I fry. I have no willpower not to enjoy it.

Do try my little nuggets of happiness. I guarantee it would always be a crowd pleaser.

Just a little tip: If you want a good pairing of sweet and sour sauce that would go well with the Lumpia, try this President’s Choice Taste of Thailand. It’s the closest in taste to Filipino lumpia dipping sauce.

A Filipino’s love affair with rice

One true fact amongst Filipino households is that rice is always part of a meal. Kanin or rice is literally eaten in the morning, noon and night with a good chance of having it in-between too. It is the staple that every Filipino finds comfort in.

Filipino-beloved kanin or steamed jasmine rice

A typical Filipino meal often starts with steamed plain rice that is paired with everything and anything, be it stews, grilled food or fried food. Rice drizzled with soy sauce is already a meal I would stop for. After all these years here in Toronto, I still have hinon-onan (fish cooked in vinegar and garlic) with rice to start my day. I have tried going North American way of a cereal and milk but I seem to just be able to sustain it for a few days. The craving for Filipino breakfast would set in really fast.

There is a bewildering variety of rice in Toronto. I find that the Milagrosa 5-star jasmine rice is the one most similar to what I grew up with. This is most easy to find as most groceries in Toronto have it.

If you find yourself a chance to be in a Filipino kitchen and see someone cook rice without the help of a rice cooker, I would bet that you would find them washing the grains with water and just putting enough water to just reach an inch from the tip of the middle finger. We used to have a thick pot we call kaldero to cook rice in and that is how I was taught to cook it back in Manila.

We like the rice fluffy and a little bit sticky. I remember pandan leaves are often thrown in to scent the rice. Just the smell of perfumed jasmine rice can make my tummy growl. Some people would say leave the pot untouched while cooking and some say stir it once to avoid burning the bottom (I must admit I find pleasure in eating tutong or the burnt crusty bottom). With the advent of rice cookers, this is now obviously a non-issue.

Now if you find yourself some left-over rice, it is best consumed the following day for breakfast as garlic fried rice. I find this the yummiest for breakfast paired with eggs over-easy and tocino (marinated sweet pork) or tocilog. I will eventually talk about tocino in another post. Right now, do try this simple garlic rice and have a breakfast like we Filipinos do.

Garlic Rice
2 tbsp canola oil
2 cloves of garlic, minced
3 – 4 cups of steamed rice
salt and pepper to taste

Heat left-over rice in microwave for 1 – 2 minutes covered with partially wet paper towel.  Microwaving with wet paper towel will revive the rice, giving it steam and moisture to make it fluffy once again. Set aside. Heat skillet and add oil. Place the burner to medium heat and sauté garlic. Be careful not to burn minced garlic. Add warmed leftover rice and mix. Add salt and pepper to taste.